Tuesday, August 30, 2011

You Never Know


When I first decided to learn to use Paint Shop Pro, I envisioned working with photos. That quickly expanded to creating graphic images. Now I've found another use for graphic skills.

I have long been a lover of Superpoke Pets. That wonderful blend of social network and graphic creation. For those who have never played, the creative elements includes different settings (habitats), which is inhabited by your selected pet. SPP provided items which you could purchase for your pet's habitat. Although it eventually included purchases for actual money, it originally included thousands of items that could be purchased with virtual currency. Some folks added a few items of furniture to their habitat. Others got more elaborate. Some greated some incredible mosaics and works of art using items in incredibly creative ways.

Now, three years later, Google has announced that it will shut down SPP in about three monts. Our family wasn't ready to give up the creative element, so we've been using PSP to help us save habitats and items, so that we can continue to create using PSP.

The image above was created in Superpoke Pets. Click on the video below, to watch it come to life. Check it out, if you'd like to see why so many people are hooked on this game.

My Underwater World

Monday, August 22, 2011

More Color Choices

In the previous post, I showed how to select some colors from the Material Palette's color block. These are just a few of the available color choices. Above the blocks of color, you will find a color circle with a color square inside it. Click on the color circle to select a color. If you watch the block at the right marked "Current", you will see that it changes as you click on different colors. The block inside the circle also changes as you select colors on the circle. You can vary the color lightness and saturation by clicking/dragging the small circle in the block. Using these two color selection tools, you can create an almost endless variety of colors.

Linda

Monday, June 13, 2011

The Materials Palette

The Flood Fill took, which was discussed in the previous post, is one of many PSP tools that let you select a color, pattern or gradient through the Materials Palette. If the Materials Palette is not visible in your workspace, press F6 to select it or select
View-->Palettes-->Materials Palette from the Menu bar.

Notice the large red and black rectangles on the right side of the image above. These show the color/pattern/gradient that will be used to fill your image, when you click the Flood Fill tool.The top color (Red in my image) will be used if you use a left mouse click. The bottom color (black in my image) will be used if you use a right mouse click.

Hold your mouse over the top rectangle. You should see a small eye dropper appear. Click on the rectangle and the Materials Palette will open. Check the tabs at the top and click the Color tab, if it is not already selected. Choose a color by clicking on one of the small color squares in the middle of the Palette, then click the OK button.

Now when you use the Flood Fill, the color you have selected will fill your image, when you use your left mouse. You can change the fill for the right mouse in the same manner.

Want more color options? Check my next pot.

Saturday, June 11, 2011

The Flood Fill Tool

The Flood Fill tool allows you to fill am image with a selected color, pattern, or gradient.
  1. Open a new image. Size doesn't matter for this exercise.
  2. Locate the Flood Fill tool on your tool bar and select it.
  3. Check the Flood Fill Options Palette and set as indicated below.
  4. Hold your mouse over the image. A small fill bucket, similar to the icon on the toolbar should appear. Click. Either the left or right mouse button is fine.
Your image should now be filled with a solid color, gradient or pattern. Didn't I say you could choose your fill? I did. That will be the topic of my next post.

Sunday, June 5, 2011

Tool Options Palette

The Tool Options Palette allows us to control the output of each of the tools on the Tool Bar. Your Tool Options may be located near your Toolbar or be floating in your workspace. If the Picture Tube tool is selected on your Toolbar, then the Tool Options should look similar to the image below. If the Tool Options palette is not visible, press F4 or select View-->Palettes-->Tool Options from your menu bar. Notice the small picture of the fish on my image. Your Tool Options will show a different image. If you press the small black arrow next to the image, you will be able to view the available picture tubes and click to select one of them. Some picture tubes contain more than one image. For now, try to find a tube that contains only one image. To do this: Click on the Settings icon on the Tool Options. It is between the tube images and the Scale option. If you hover your mouse over it, you should see the Settings tooltip. Click on it. 
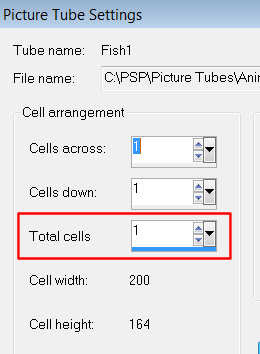
If the selected tube has only one picture, the Total Cells will be 1. Otherwise, there are multiple pictures for the tube and you should try another tube. Caution: Use the Cancel button to close the Settings window and don't change any of the values in it. This could cause the tube to work improperly. More on this in later posts. Open a new image using the instructions provided in yesterday's post. Click in the center of the image to place your selected picture tube. If the picture tube is too large or too small for the image, you'll want to correct its size. Look for the Scale adjustment located to the right of Settings on the Tool Options palette. If you would like the picture tube to be smaller, reduce the scale. Increase the scale, if you would like a larger picture tube. Press the Delete key or the Undo arrow to clear the original picture tube from your image and test your adjusted scale. Play with the scale adjustment until your picture tube fits into your image. 
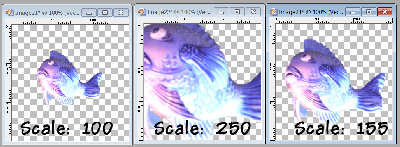
Tomorrow you'll learn how to create a background for your image. Hope to see you then.

Saturday, June 4, 2011

Picture Tubes

The picture tube is a unique feature of PSP that can be used to easily create an image. PSP contains some picture tubes that have been included with your software. Many PSP users create and offer free picture tubes on their websites. As you gain more PSP experience, you can create your own picture tubes as well.

First you will need to open a new image by selecting File-->New from the Menu bar. Click here to view the image settings that you need to use. Click the OK button after doing this.

Locate the picture tube tool on your toolbar. Because the toolbar is customizable, it may not be located in the same spot as the one in the image at the left, but it should look the same. You can confirm that you have the correct tool by hovering your mouse over the picture tube icon. If you have the correct icon, you will see that the tooltip says Picture Tube. Click on the Picture Tube icon to select it.

Now hold your mouse over the center of your image and click the left mouse button. A picture should appear.


You haven't chosen a picture, so the picture you will get will not be predictable. Do you wish you had a different picture? Is your picture tube too big or too small for the image? Check back tomorrow to learn more.

Thursday, June 2, 2011

Tools

Hopefully, you've found a version of PSP and installed it on your computer. While there are some differences between the versions, much of the basic functionality is the same and you should be able to follow my instructions, regardless of version differences. Leave a comment, however, if something is not clear.

Before you can create or modify images, you'll need to locate your tools. Open PSP and look for the toobar. The PSP9 toolbar is pictured at the left. Other versions' bars will look similar. The bar may be anchored to the side or top of your screen, or float in the central workplace. If you are unable to find the toolbar, Select View/Tools/Toolbars from your menu bar. Your toolbar should now be displayed.

Tomorrow, we will use one of these tools, the picture tube, to create an image.

Linda

Wednesday, June 1, 2011

Purchasing PSP

The easiest way to purchase Paint Shop Pro is through Corel. Currently the full version of PSP X3 is being sold for $39.99 and upgrades are $34.99.

When it comes to software, most people will automatically choose the latest version. That may be the right choice for you with PSP as well. Still you might want to consider the following, when making your choice.

Corel purchased Paint Shop Pro from Jasc, who created PSP through version 9. Corel has subsequently added versions X, XI, X2 and X3.

Corel's X series use substantially more memory than the earlier versions. If your computer is already memory challenged, you might consider a less weighty version. My first PSP software was version XI and I had no trouble using it with my XP operating system. It does not play nicely with my Windows 7 system. I didn't purchase X3, but used the 30 day trial and had similar problems.

On the brighter side, X3 does have a number of new photo processing features. Check out the link provided to get a full description. If your main interest is editing and enhancing your photos, this may be the version for you. There is a tabbed section on that page which includes a tab for a 30 day free trial. I'd recommend the trial, if you are interested in X3. You'll be able to determine how well it works with your computer during that period.

Jasc's PSP9 version is favored by many PSP users. It's a good choice, if you are interested in creating your own images or animations. Animation Shop, a Jasc product that is included with PSP9 at no extra cost, is used to create animated images. You'll have to do an online search to acquire this version. It is not too difficult to find free downloads. If you're hesitant to download from unfamiliar sites, consider buying a used copy through Ebay. There are currently a number of copies starting under $10. Be sure that the Animation Shop disc has been included in the purchase.

So choose your copy of PSP and get it installed. Then you can move on to the fun stuff.

Linda

Tuesday, May 31, 2011

Three Reasons To Learn Paint Shop Pro

In 2007, I made the decision to learn more about graphics. My daughter was always doing nifty things with her photos and I was intrigued. Curiosity turned to passion, particularly for Paint Shop Pro graphics software. No, this isn't a paid post. Along with many other PSP users, I'm enthusiastic about the software and would like to share my enthusiasm with others. Paint Shop isn't the only graphics software available. Here's a few reasons that I recommend it.
  1. Versatility - Whether you are cleaning and cropping photos, designing a web page or creating images from scratch, Paint Shop Pro will simplify your work.
  2. Friendly - There is a learning curve associated with any graphics software, but I've found Paint Shop Pro's to be the easiest. Although it is capable of producing some sophisticated effects, the basics can be learned in a short period of time and will provide an amazing amount of functionality. Partnered with Jasc's Animation Shop, it can be used to produce your own animated images.
  3. Inexpensive - Its capabilities are close to that of far more pricey software, such as Photoshop.
So where do you find Paint Shop Pro? Check back tomorrow and I'll tell you about your choices.
Linda

Monday, May 30, 2011

Revisit, Return, Revamp

It's been over two years since I began this blog. Health issues, an interstate move and a need to rethink my approach stopped its progress for a while. Now that my health has had some improvement, we've settled into our Tennessee home and I've given a lot of thought to this blog.

Within a few months of learning Paint Shop Pro, I became interested in writing my own PSP scripts. I had never written Python code, but spent a career in computer programming and web design,so my interest is not that surprising. It gave such power to image creation, particularly in the area of animation, that I wanted to share my knowledge with other PSP enthusiasts.

While there is some interest in scripting, particularly among scrapbookers, there are far more folks who simply want to fix a photo, reposition an image or add a simple effect. I've taken that into consideration when planning changes to this blog. Future posts will include information on acquiring PSP, basic skills, PSP resources and even some freebies.

I hope you'll check back regularly to see what is new.

Linda

Wednesday, May 25, 2011

Wednesday Where

in the World Wide Web . . .

can you find a text-editor that works well with Python and a lot of other languages?

If you caught yesterday's post, you heard about my struggle with Python and whitespace woes. But the woes disappeared when I found Notepad++.

Notepad++ is simple to use and reminiscent of it's unplussed namesake. Unlike some Python-aware editors, it doesn't require that you install Python to use it. It has a lot of wonderful features too. One of my favorites is the zoom feature, great for my less-than-perfect eyesight. The zoom also comes in handy when I want to capture screen shots. You can choose color-coded syntax for over forty languages and change colors to meet your own preferences. And if needed, you can even define your own languages.

You can use the View menu to display indentation guides and white space. I always turn this on when writing scripts, since it makes it easy to spot places where there might be mixed leading spaces and tabs. And the TextFx menu has an option to convert spaces to tabs.


If you'd like to check it out, you can download Notepad++ here.

Notepad++ Download Site

Once you've installed Notepad++, you'll need to change the Python Source Editor in your File Locations and have it point to Notepad++.exe. If you used installation defaults, it should be located in your Program Files.

Hope you'll check out this easy, functional and free text editor. And that you'll stop by tomorrow for Thursday thoughts.

Linda

Tuesday, May 24, 2011

Tuesday Tips


Watch Your Whitespace

is today's tip. And a very important one when using Python script.

When I first started playing with scripts, I couldn't figure out why I was having a problem. When adding a simple loop in the code, I suddenly had a lot of error messages. But when I looked at my script, I couldn't see anything wrong. Eventually, I read that Python didn't handle mixed white space well. You can use either spaces or tabs for indentation, but beware mixing them.

I learned about using a Python-aware editor. That solved a lot of problems, particularly on scripts that I recorded and edited. But when I tried to modify a script that I hadn't created, I frequently got errors again. Since I didn't have any control over which editor other folks used in their scripts, I was puzzled as how to solve this problem.

Then I found an easy to use text editor that can take a script with mixed white space and correct it. With one easy command. And it's not an editor that is exclusive for Python. It provides color-coded syntax for HTML, Javascript, Perl, ASP, PHP and many other languages.

If you'd like to know Where in the World Wide Web I found this editor, just check back tomorrow. Did I mention that it's free?
Linda

Sunday, May 22, 2011

Monday Mix-Ups


Give it a TRY

Last Monday, I talked about Simple filters - easy to use and easy to script. After showing how to add the filter to the script, I mentioned that it was important to check that the script user has the Simple filter available on their computer. Today, I'll show you the simplest way I know to do that.

Python has a very handy command called try. If you "try" a command and it doesn't work, it won't cause errors in your script. Even better, you can specify an action or actions to take, which will replace the command which didn't work. Here's what it looks like:

In the example, I've told Python to substitute Colorize and Blinds, if the HorizontalGrain effect doesn't work. It will also print a message to the Script Output Palette.

(Note: I'm not showing the substitute effect settings in this example, but you would want your script to include these.)

Notice how the HorizontalGrain effect is indented under try: and the substitute effects are indented under except:. The indentation tells Python which commands are included in the try and except processes. When the indentation stops (line 17), Python will continue executing the commands regardless of whether the HorizontalGrain or substitute effects were used.

If you didn't want to use a substitute, you might include a Message dialog box in the exception section. You could show where to download the effect, then cancel the script. If you haven't ever used a Message box or cancelled a script, keep checking back. I'll be showing how to do that in future blogs.

I'll be back tomorrow with Tuesday Tips.
Linda

Monday, May 16, 2011

Monday Mix-Ups


Keep it simple. That's good advice for many things in life. But today, I'm referring to Simple Filters, a free and easy-to-use plug-in for PSP. It's called Simple, because there are no plug-in settings for the filters. Run the plug-in, get an effect.

Simple Filters also simplify life for the PSP scripter. These filters can be recorded in your scripts without any concern for settings. What could be simpler?

I like the Horizontal Grain effect which was used on the image above. By reducing opacity to the original and effect layers, it can also be used to create some lovely backgrounds. Here's all the code that's required to apply the filter to an image.

If you're sharing the script, then you'll need to check that the user has the Simple plug-in installed. More about that in the near future. Despite the name, the effects created with these filters are very versatile. Check out the Simple Filter Site to download the filters and see examples of applied filters.

Have fun and check back tomorrow for Tuesday Tips.
Linda

Sunday, May 15, 2011

Sunday Starters


One of my favorite childhood toys was a kaleidoscope.  The outside was made of brightly colored cardboard, but the inside was the real mystery.  I remember profound disappointment when I opened one.  I still didn't understand how it worked.  And, of course, it never did work again. Back then,  I was able to replace it by savings two weeks allowance (10 cents total) and making a trip to the aptly named Five & Dime store.  I certainly got a shock the other day when I came across ads for kaleidoscopes that were in the $100 range.  I looked a little more and found some that were meant for children.  These weren't nearly as pricey, but still cost more than I'd want to pay for a cardboard toy.

I wondered how hard it would be to make a kaleidoscope.  "Quite difficult" was my first impression. Directions for children's crafts included 3 pieces of mirrored glass.  Not near our 6 year old's fingers!  Others included several components that would have to be purchased.  How does that help save money? I finally did come up with some instructions that were acceptable and I'm sharing them below.   But in the process, I came up with some other sites that provide a lot of online kaleidoscope fun.

Create A Kaleidoscope

I had lots of fun with this kaleidoscope, from the Childhood section of the Victoria and Albert Museum site, is my favorite. Use the mouse to drag toys into a workspace. The toys are reflected in a virtual kaleidoscope. Color, background and reflection controls add even more variety. Simple enough for a young child to use.


Kaleidoscope Painter

Create a kaleidoscope-like pattern by moving the mouse over the workspace surface. There are options for brush size and one option that just let's you sit back and watch. It's easy enough for children to use - as long as the adult will relinquish the mouse!


For those who like jigsaws, check out the kaleidoscope jigsaws at MyPuzzle.org. You can select the number of puzzle pieces, as few as 16 pieces for the younger puzzle fans.

If you still want to make one by hand, check out this version at Cool Kids Craft Ideas. This one uses materials you probably have at home already. The instructions are clear and even a young child will be able to do most of them. It's got my vote!

See you tomorrow for Monday Mixup.
Linda

Saturday, April 30, 2011

Saturday Scripts


I was so excited to see the comments from all of you last week. Sharing my scripting knowledge has been one of my dreams and you're helping to make it come true. So thanks to all of you. Most of you have been playing with PSP for many more years than I have, so I know this will be an opportunity for me to learn too.

I'll be asking you to post a link to your assignments, starting with this lesson. That's why I asked about html experience. It sounds like most of you have enough experience to create a basic page. But please post a comment, if you are having any difficulty, I'd be happy to provide a basic template. You'll need a web site also. One of the free sites will be sufficient for this. Again, just let me know if you need assistance.

I noticed that several of you mentioned scrapping as a reason for learning scripts. I began scripting because I wanted a way to automate the creation of frames for Animation Shop. I know that others like to create scripts that do batch processing of images. I hope to learn more from all of you about what you are doing or want to do with scripts. I'll also try to incorporate some of your interests into the material. Regardless of why you want to learn scripting, the basic skills will be the same for all.

We seem to have a range of scripting experience. As you may have noted, I'm starting with the basics so that everyone can follow the course. This week's lesson is on running scripts. I'm hoping that even those of you with experience in this area will find a little something new. If not, hang in there. The next lesson will cover recording a script and then we'll begin to learn how to edit scripts. Click the button to check out this week's lesson.
Lesson Link

I'm really looking forward to seeing your comments and assignments.

Come back tomorrow for Sunday Starters - a day devoted to fostering creativity in the children you love.

P.S. I noticed that there are some tut writers in our group. I recently found some great
( and free ) software to easily capture and save screenshots. I tell about it in yesterday's Friday Freebie. If you didn't see it, take a moment to check it out.

Linda

Friday, April 22, 2011

Friday Freebies


If you write a lot of tutorials or do anything that requires frequent screenshots, you should check this out. This free software adds a whole new dimension to your PrintScreen key.

The download is quick, the installation is easy and the interface is very intuitive. Play with the options until you find what works best for you. I like the option that let's each screenshot be sent to my chosen folder. The first time I used it, I couldn't quite believe that it was working, until I saw all the sequentially numbered images that had been sent to my folder. There's an option to capture those tools that usually elude screen shots too.


You can choose to capture the full screen, the current window, or a selected area of the screen. It will do it's work silently or work interactively. It can send screenshots to your printer. If you don't want your PrintScreen key linked to the software, you can specify another key combination. And, best of all, the price is right! You will see other software for sale at the site, but this meets my needs perfectly and it's not just a trial version. Just click to access the GadwinPrintScreen download.

Tomorrow brings a 2nd scripting lesson in Saturday Scripts. Hope to see you then.

Linda

Monday, April 11, 2011

Wednesday Where


in the World Wide Web . . .

could you find a free, customizeable calendar? Look no further than PSP and these scripts!

My images have been greatly resized to fit here, but the script will produce full sized calendar pages. There's a script for a one month calendar and the second script creates a one page yearly calendar. With both, you get to select your font and choose it's size and color.

Once you've run the script, the fun has just begun. Since the calendar is created in PSP with a transparent backing, you can add your own background and special touches. There's no limit to the variety of calendars you can produce.

The scripts offer more than just calendars. There's a lot to learn too. It can be difficult for novice scripters to see beyond a script that produces an exact replica of an image. These scripts are great examples of script versatility. More experienced scripters might enjoy taking a look at the code to see how it works. The section that brings up the font selection box is well worth taking the time to study.

Linda