Monday, June 13, 2011

The Materials Palette

The Flood Fill took, which was discussed in the previous post, is one of many PSP tools that let you select a color, pattern or gradient through the Materials Palette. If the Materials Palette is not visible in your workspace, press F6 to select it or select
View-->Palettes-->Materials Palette from the Menu bar.

Notice the large red and black rectangles on the right side of the image above. These show the color/pattern/gradient that will be used to fill your image, when you click the Flood Fill tool.The top color (Red in my image) will be used if you use a left mouse click. The bottom color (black in my image) will be used if you use a right mouse click.

Hold your mouse over the top rectangle. You should see a small eye dropper appear. Click on the rectangle and the Materials Palette will open. Check the tabs at the top and click the Color tab, if it is not already selected. Choose a color by clicking on one of the small color squares in the middle of the Palette, then click the OK button.

Now when you use the Flood Fill, the color you have selected will fill your image, when you use your left mouse. You can change the fill for the right mouse in the same manner.

Want more color options? Check my next pot.

Saturday, June 11, 2011

The Flood Fill Tool

The Flood Fill tool allows you to fill am image with a selected color, pattern, or gradient.
  1. Open a new image. Size doesn't matter for this exercise.
  2. Locate the Flood Fill tool on your tool bar and select it.
  3. Check the Flood Fill Options Palette and set as indicated below.
  4. Hold your mouse over the image. A small fill bucket, similar to the icon on the toolbar should appear. Click. Either the left or right mouse button is fine.
Your image should now be filled with a solid color, gradient or pattern. Didn't I say you could choose your fill? I did. That will be the topic of my next post.

Sunday, June 5, 2011

Tool Options Palette

The Tool Options Palette allows us to control the output of each of the tools on the Tool Bar. Your Tool Options may be located near your Toolbar or be floating in your workspace. If the Picture Tube tool is selected on your Toolbar, then the Tool Options should look similar to the image below. If the Tool Options palette is not visible, press F4 or select View-->Palettes-->Tool Options from your menu bar. Notice the small picture of the fish on my image. Your Tool Options will show a different image. If you press the small black arrow next to the image, you will be able to view the available picture tubes and click to select one of them. Some picture tubes contain more than one image. For now, try to find a tube that contains only one image. To do this: Click on the Settings icon on the Tool Options. It is between the tube images and the Scale option. If you hover your mouse over it, you should see the Settings tooltip. Click on it. 
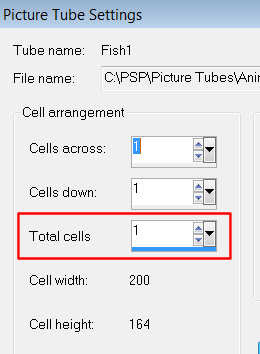
If the selected tube has only one picture, the Total Cells will be 1. Otherwise, there are multiple pictures for the tube and you should try another tube. Caution: Use the Cancel button to close the Settings window and don't change any of the values in it. This could cause the tube to work improperly. More on this in later posts. Open a new image using the instructions provided in yesterday's post. Click in the center of the image to place your selected picture tube. If the picture tube is too large or too small for the image, you'll want to correct its size. Look for the Scale adjustment located to the right of Settings on the Tool Options palette. If you would like the picture tube to be smaller, reduce the scale. Increase the scale, if you would like a larger picture tube. Press the Delete key or the Undo arrow to clear the original picture tube from your image and test your adjusted scale. Play with the scale adjustment until your picture tube fits into your image. 
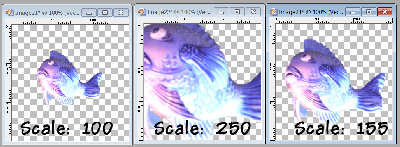
Tomorrow you'll learn how to create a background for your image. Hope to see you then.

Saturday, June 4, 2011

Picture Tubes

The picture tube is a unique feature of PSP that can be used to easily create an image. PSP contains some picture tubes that have been included with your software. Many PSP users create and offer free picture tubes on their websites. As you gain more PSP experience, you can create your own picture tubes as well.

First you will need to open a new image by selecting File-->New from the Menu bar. Click here to view the image settings that you need to use. Click the OK button after doing this.

Locate the picture tube tool on your toolbar. Because the toolbar is customizable, it may not be located in the same spot as the one in the image at the left, but it should look the same. You can confirm that you have the correct tool by hovering your mouse over the picture tube icon. If you have the correct icon, you will see that the tooltip says Picture Tube. Click on the Picture Tube icon to select it.

Now hold your mouse over the center of your image and click the left mouse button. A picture should appear.


You haven't chosen a picture, so the picture you will get will not be predictable. Do you wish you had a different picture? Is your picture tube too big or too small for the image? Check back tomorrow to learn more.

Thursday, June 2, 2011

Tools

Hopefully, you've found a version of PSP and installed it on your computer. While there are some differences between the versions, much of the basic functionality is the same and you should be able to follow my instructions, regardless of version differences. Leave a comment, however, if something is not clear.

Before you can create or modify images, you'll need to locate your tools. Open PSP and look for the toobar. The PSP9 toolbar is pictured at the left. Other versions' bars will look similar. The bar may be anchored to the side or top of your screen, or float in the central workplace. If you are unable to find the toolbar, Select View/Tools/Toolbars from your menu bar. Your toolbar should now be displayed.

Tomorrow, we will use one of these tools, the picture tube, to create an image.

Linda

Wednesday, June 1, 2011

Purchasing PSP

The easiest way to purchase Paint Shop Pro is through Corel. Currently the full version of PSP X3 is being sold for $39.99 and upgrades are $34.99.

When it comes to software, most people will automatically choose the latest version. That may be the right choice for you with PSP as well. Still you might want to consider the following, when making your choice.

Corel purchased Paint Shop Pro from Jasc, who created PSP through version 9. Corel has subsequently added versions X, XI, X2 and X3.

Corel's X series use substantially more memory than the earlier versions. If your computer is already memory challenged, you might consider a less weighty version. My first PSP software was version XI and I had no trouble using it with my XP operating system. It does not play nicely with my Windows 7 system. I didn't purchase X3, but used the 30 day trial and had similar problems.

On the brighter side, X3 does have a number of new photo processing features. Check out the link provided to get a full description. If your main interest is editing and enhancing your photos, this may be the version for you. There is a tabbed section on that page which includes a tab for a 30 day free trial. I'd recommend the trial, if you are interested in X3. You'll be able to determine how well it works with your computer during that period.

Jasc's PSP9 version is favored by many PSP users. It's a good choice, if you are interested in creating your own images or animations. Animation Shop, a Jasc product that is included with PSP9 at no extra cost, is used to create animated images. You'll have to do an online search to acquire this version. It is not too difficult to find free downloads. If you're hesitant to download from unfamiliar sites, consider buying a used copy through Ebay. There are currently a number of copies starting under $10. Be sure that the Animation Shop disc has been included in the purchase.

So choose your copy of PSP and get it installed. Then you can move on to the fun stuff.

Linda