Tuesday, August 30, 2011

You Never Know


When I first decided to learn to use Paint Shop Pro, I envisioned working with photos. That quickly expanded to creating graphic images. Now I've found another use for graphic skills.

I have long been a lover of Superpoke Pets. That wonderful blend of social network and graphic creation. For those who have never played, the creative elements includes different settings (habitats), which is inhabited by your selected pet. SPP provided items which you could purchase for your pet's habitat. Although it eventually included purchases for actual money, it originally included thousands of items that could be purchased with virtual currency. Some folks added a few items of furniture to their habitat. Others got more elaborate. Some greated some incredible mosaics and works of art using items in incredibly creative ways.

Now, three years later, Google has announced that it will shut down SPP in about three monts. Our family wasn't ready to give up the creative element, so we've been using PSP to help us save habitats and items, so that we can continue to create using PSP.

The image above was created in Superpoke Pets. Click on the video below, to watch it come to life. Check it out, if you'd like to see why so many people are hooked on this game.

My Underwater World

Monday, August 22, 2011

More Color Choices

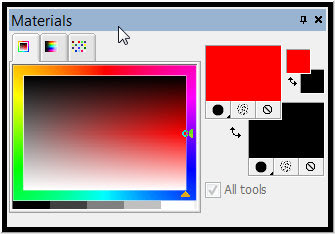
In the previous post, I showed how to select some colors from the Material Palette's color block. These are just a few of the available color choices. Above the blocks of color, you will find a color circle with a color square inside it. Click on the color circle to select a color. If you watch the block at the right marked "Current", you will see that it changes as you click on different colors. The block inside the circle also changes as you select colors on the circle. You can vary the color lightness and saturation by clicking/dragging the small circle in the block. Using these two color selection tools, you can create an almost endless variety of colors.

Linda

Monday, June 13, 2011

The Materials Palette

The Flood Fill took, which was discussed in the previous post, is one of many PSP tools that let you select a color, pattern or gradient through the Materials Palette. If the Materials Palette is not visible in your workspace, press F6 to select it or select
View-->Palettes-->Materials Palette from the Menu bar.

Notice the large red and black rectangles on the right side of the image above. These show the color/pattern/gradient that will be used to fill your image, when you click the Flood Fill tool.The top color (Red in my image) will be used if you use a left mouse click. The bottom color (black in my image) will be used if you use a right mouse click.

Hold your mouse over the top rectangle. You should see a small eye dropper appear. Click on the rectangle and the Materials Palette will open. Check the tabs at the top and click the Color tab, if it is not already selected. Choose a color by clicking on one of the small color squares in the middle of the Palette, then click the OK button.

Now when you use the Flood Fill, the color you have selected will fill your image, when you use your left mouse. You can change the fill for the right mouse in the same manner.

Want more color options? Check my next pot.

Saturday, June 11, 2011

The Flood Fill Tool

The Flood Fill tool allows you to fill am image with a selected color, pattern, or gradient.
  1. Open a new image. Size doesn't matter for this exercise.
  2. Locate the Flood Fill tool on your tool bar and select it.
  3. Check the Flood Fill Options Palette and set as indicated below.
  4. Hold your mouse over the image. A small fill bucket, similar to the icon on the toolbar should appear. Click. Either the left or right mouse button is fine.
Your image should now be filled with a solid color, gradient or pattern. Didn't I say you could choose your fill? I did. That will be the topic of my next post.

Sunday, June 5, 2011

Tool Options Palette

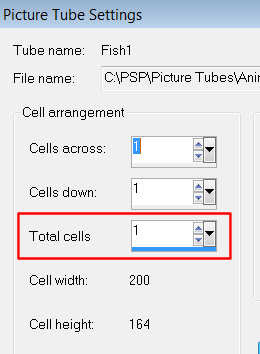
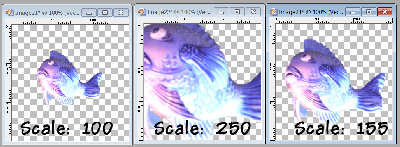
The Tool Options Palette allows us to control the output of each of the tools on the Tool Bar. Your Tool Options may be located near your Toolbar or be floating in your workspace. If the Picture Tube tool is selected on your Toolbar, then the Tool Options should look similar to the image below. If the Tool Options palette is not visible, press F4 or select View-->Palettes-->Tool Options from your menu bar. Notice the small picture of the fish on my image. Your Tool Options will show a different image. If you press the small black arrow next to the image, you will be able to view the available picture tubes and click to select one of them. Some picture tubes contain more than one image. For now, try to find a tube that contains only one image. To do this: Click on the Settings icon on the Tool Options. It is between the tube images and the Scale option. If you hover your mouse over it, you should see the Settings tooltip. Click on it. If the selected tube has only one picture, the Total Cells will be 1. Otherwise, there are multiple pictures for the tube and you should try another tube. Caution: Use the Cancel button to close the Settings window and don't change any of the values in it. This could cause the tube to work improperly. More on this in later posts. Open a new image using the instructions provided in yesterday's post. Click in the center of the image to place your selected picture tube. If the picture tube is too large or too small for the image, you'll want to correct its size. Look for the Scale adjustment located to the right of Settings on the Tool Options palette. If you would like the picture tube to be smaller, reduce the scale. Increase the scale, if you would like a larger picture tube. Press the Delete key or the Undo arrow to clear the original picture tube from your image and test your adjusted scale. Play with the scale adjustment until your picture tube fits into your image. Tomorrow you'll learn how to create a background for your image. Hope to see you then.
Saturday, June 4, 2011

Picture Tubes

The picture tube is a unique feature of PSP that can be used to easily create an image. PSP contains some picture tubes that have been included with your software. Many PSP users create and offer free picture tubes on their websites. As you gain more PSP experience, you can create your own picture tubes as well.
First you will need to open a new image by selecting File-->New from the Menu bar. Click here to view the image settings that you need to use. Click the OK button after doing this.

Locate the picture tube tool on your toolbar. Because the toolbar is customizable, it may not be located in the same spot as the one in the image at the left, but it should look the same. You can confirm that you have the correct tool by hovering your mouse over the picture tube icon. If you have the correct icon, you will see that the tooltip says Picture Tube. Click on the Picture Tube icon to select it.

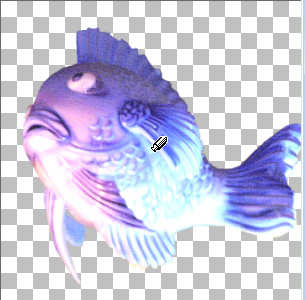
Now hold your mouse over the center of your image and click the left mouse button. A picture should appear.


You haven't chosen a picture, so the picture you will get will not be predictable. Do you wish you had a different picture? Is your picture tube too big or too small for the image? Check back tomorrow to learn more.

Thursday, June 2, 2011

Tools

Hopefully, you've found a version of PSP and installed it on your computer. While there are some differences between the versions, much of the basic functionality is the same and you should be able to follow my instructions, regardless of version differences. Leave a comment, however, if something is not clear.

Before you can create or modify images, you'll need to locate your tools. Open PSP and look for the toobar. The PSP9 toolbar is pictured at the left. Other versions' bars will look similar. The bar may be anchored to the side or top of your screen, or float in the central workplace. If you are unable to find the toolbar, Select View/Tools/Toolbars from your menu bar. Your toolbar should now be displayed.

Tomorrow, we will use one of these tools, the picture tube, to create an image.

Linda